PyBindGen Tutorial
What is PyBindGen ?
PyBindGen is a tool which can be used to generate python bindings for C or C++ APIs. It is similar in scope to tools such as boost::python, SWIG, and a few others but has a number of specific features which make it especially useful in a number of cases:
- PyBindGen is implemented in python and is used and controlled through python;
- PyBindGen error messages do not involve c++ template deciphering (as in boost::python);
- PyBindGen generates highly-readable C or C++ code so it is possible to step into and debug the bindings;
- In simple cases, PyBindGen is really easy to use. In more complicated cases, it does offer all the flexibility you need to wrap complex C or C++ APIs;
- PyBindGen also provides an optional tool to parse C and C++ headers and generate automatically bindings for them, potentially using extra inline or out-of-line annotations. This tool is based on gccxml and pygccxml: it can be used to generate the first version of the bindings and tweak them by hand later or as a fully automated tool to continuously generate bindings for changing C/C++ APIs.
This tutorial will show how to build bindings for a couple of common C and C++ API idioms and, then, will proceed to show how to use the automatic binding generator.
Work flows
PyBindGen is only a Python module. The programmer must write a Python script that uses the module in order to generate the bindings. There are several ways that PyBindGen can be used:
- Basic mode, script that directly generates the bindings;

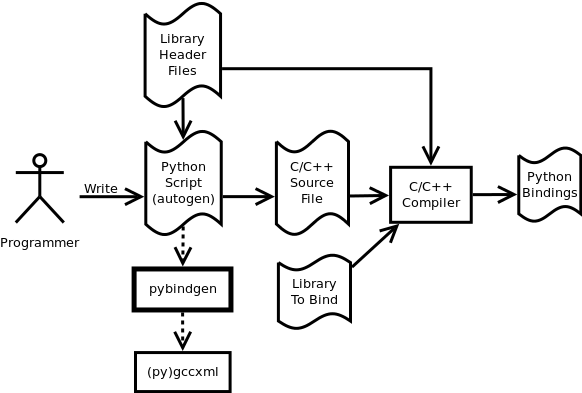
2. Automatically scan header files and generate the bindings directly (see Header file scanning with (py)gccxml);
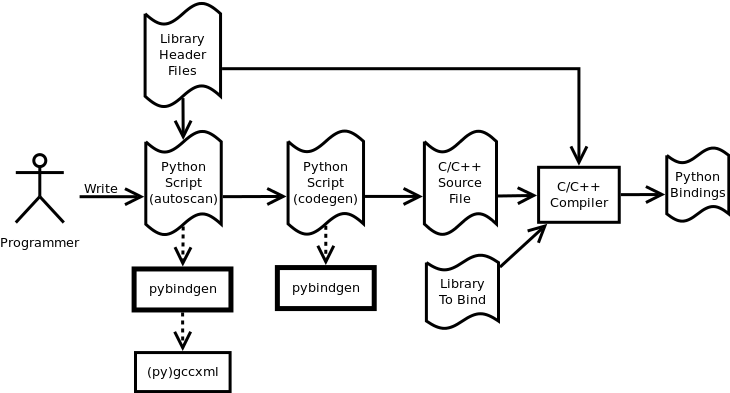
3. Automatically scan header files to generate API defs file, that file can later be used to generate the bindings. See (see Header file scanning with (py)gccxml: python intermediate file);
A simple example
The best way to get a feel for what PyBindGen looks like is to go through a simple example.
Code generation script
Let’s assume that we have a simple C API as shown below declared in a header my-module.h:
void MyModuleDoAction (void);
What we want to do is call this C function from python and be able to write python code such as:
import MyModule

MyModule.MyModuleDoAction ()
Getting there is, hopefully, not very complicated: we just need to write a small python program whose job is to generate the C code which will act as a bridge between our user’s python program and the underlying C function. First, we import the pybindgen and the sys modules:
import pybindgen
import sys
Then, we create an object to represent the module we want to generate:
mod = pybindgen.Module('MyModule')
add our C header:
mod.add_include('"my-module.h"')
and register our function which returns no value (hence, the second argument ‘None’), and, takes no arguments (hence, the third argument, the empty list ‘[]’):
mod.add_function('MyModuleDoAction', None, [])
Finally, we generate code for this binding directed to standard output:
mod.generate(sys.stdout)
The final program is pretty short:
import pybindgen
import sys

mod = pybindgen.Module('MyModule')
mod.add_include('"my-module.h"')
mod.add_function('MyModuleDoAction', None, [])
mod.generate(sys.stdout)
Building it (GCC instructions)
This very small example is located in the first-example directory, together with a small makefile which will build our small C library, the bridging code, and a python module:
mathieu@ns-test:~/code/pybindgen$ cd tutorial/first-example/
mathieu@ns-test:~/code/pybindgen/tutorial/first-example$ make
gcc -fPIC -c -o my-module.o my-module.c
gcc -shared -o libmymodule.so my-module.o
PYTHONPATH=$PYTHONPATH:../../ python my-module.py > my-module-binding.c
gcc -fPIC -I/usr/include/python2.5 -c -o my-module-binding.o my-module-binding.c
gcc -shared -o MyModule.so -L. -lmymodule my-module-binding.o
mathieu@ns-test:~/code/pybindgen/tutorial/first-example$
The first two lines are simply used to build our example C library in libmymodule.so so, these are not very interesting. The more interesting bit starts with:
PYTHONPATH=$PYTHONPATH:../../ python my-module.py > my-module-binding.c
which is just a fancy way to run our binding generator program while ensuring that it will find the pybindgen module and while dumping the output of the program to the file named my-module-binding.c. This file is then build and linked into a python module:
gcc -fPIC -I/usr/include/python2.5 -c -o my-module-binding.o my-module-binding.c
gcc -shared -o MyModule.so -L. -lmymodule my-module-binding.o
Building it (MSVC instructions)
Change to the first-example directory, make a Release subdirectory, and go to it by doing:
cd first-example
md Release
cd Release
Build a Release version of MyModule.pyd by doing:
cl /LD /O2 /MD /EHsc /W3 /I C:\python26\include /D WIN32 /D NDEBUG /D _CONSOLE ..\my-module.c ..\my-module-binding.c /link /OUT:MyModule.pyd /IMPLIB:MyModule.lib /LIBPATH:"C:\python26\libs"
which creates:
my-module-binding.obj
my-module.obj
MyModule.exp
MyModule.lib
MyModule.pyd
MyModule.pyd.manifest
If you wanted to debug your extensions you’d have to first create a debug version of Python yourself by compiling the Python sources.
Testing it
Once all of that code is built, we obviously want to run it. Setting up your system to make sure that the python module is found by the python runtime is outside the scope of this tutorial but, for most people, the following session should be self-explanatory:
mathieu@ns-test:~/code/pybindgen/tutorial/first-example$ export LD_LIBRARY_PATH=$LD_LIBRARY_PATH:.
mathieu@ns-test:~/code/pybindgen/tutorial/first-example$ export PYTHONPATH=$PYTHONPATH:.
mathieu@ns-test:~/code/pybindgen/tutorial/first-example$ python
Python 2.5.1 (r251:54863, Mar  7 2008, 03:39:23)
[GCC 4.1.3 20070929 (prerelease) (Ubuntu 4.1.2-16ubuntu2)] on linux2
Type "help", "copyright", "credits" or "license" for more information.
>>> import MyModule
>>> MyModule.MyModuleDoAction ()
You called MyModuleDoAction !
Wrapping types by value
Primitive types
The first example showed how to call a function which takes no arguments and returns no values which, obviously, is not especially interesting so, let’s look at how we can give meaningfull arguments to our function:
int MyModuleDoAction (int v1, int v2);
and the corresponding bit from the code generation script: the second argument to add_function specifies that our function returns a value of type ‘int’ and the third argument specifies that our function takes as a single argument an ‘int’ of name ‘value’:
mod.add_function('MyModuleDoAction',
                  pybindgen.retval ('int'),
                 [pybindgen.param ('int', 'v1'),
                  pybindgen.param ('int', 'v2')])
The above then allows you to write:
>>> import MyModule
>>> v = MyModule.MyModuleDoAction (10, -1)
You called MyModuleDoAction: 10
>>> print v
10
>>> v = MyModule.MyModuleDoAction (v2=5, v1=-2)
You called MyModuleDoAction: -2
>>> print v
-2
Which shows how the argument name can be used to avoid using positional arguments.
Of course, the above example could be rewritten to the more compact and readable:
from pybindgen import *
mod.add_function('MyModuleDoAction', retval ('int'),
                 [param ('int', 'v1'),
                  param ('int', 'v2')])
In the following examples, this is what we will do to avoid extra typing.
Enum types
Enums are often used to define C and C++ constants as shown below:
enum MyEnum_e
{
  CONSTANT_A,
  CONSTANT_B,
  CONSTANT_C
};
void MyModuleDoAction (enum enum_e value);
And wrapping them is also pretty trivial:
from pybindgen import *
import sys

mod = Module('MyModule')
mod.add_include('"my-module.h"')
mod.add_enum('MyEnum_e', ['CONSTANT_A', 'CONSTANT_B', 'CONSTANT_C'])
mod.add_function('MyModuleDoAction', None, [param('MyEnum_e', 'value')])
mod.generate(sys.stdout)
With the resulting python-visible API:
>>> import MyModule
>>> print MyModule.CONSTANT_A
0
>>> print MyModule.CONSTANT_B
1
>>> print MyModule.CONSTANT_C
2
>>> MyModule.MyModuleDoAction (MyModule.CONSTANT_B)
MyModuleDoAction: 1
Compound types
Passing a structure to and from C is not really more complicated than our previous example. The API below:
struct MyModuleStruct
{
  int a;
  int b;
};
struct MyModuleStruct MyModuleDoAction (struct MyModuleStruct value);
can be bound to python using the following script:
from pybindgen import *
import sys

mod = Module('MyModule')
mod.add_include('"my-module.h"')
struct = mod.add_struct('MyModuleStruct')
struct.add_instance_attribute('a', 'int')
struct.add_instance_attribute('b', 'int')
mod.add_function('MyModuleDoAction', retval ('MyModuleStruct'), [param ('MyModuleStruct', 'value')])
mod.generate(sys.stdout)
The most obvious change here is that we have to define the new structure type:
struct = mod.add_struct('MyModuleStruct')
and register the names and types of each of the members we want to make accessible from python:
struct.add_instance_attribute('a', 'int')
struct.add_instance_attribute('b', 'int')
The name of the method called here, ‘add_instance_attribute’ reflects the fact that PyBindGen can wrap both C and C++ APIs: in C++, there exist both instance and static members so, PyBindGen provides two methods: add_instance_attribute and add_static_attribute to register these two kinds of members.
- Our C API then becomes accessible from python::
>>> import MyModule
>>> st = MyModule.MyModuleStruct ()
>>> st.a = 10
>>> st.b = -20
>>> st.c = -10
Traceback (most recent call last):
  File "<stdin>", line 1, in <module>
AttributeError: 'MyModule.MyModuleStruct' object has no attribute 'c'
>>> v = MyModule.MyModuleDoAction (st)
You called MyModuleDoAction: 10
>>> print v
<MyModule.MyModuleStruct object at 0x2b5ef522b150>
>>> print v.a
10
>>> print v.b
-20
C++ classes
Wrapping C++ classes is very similar to wrapping a C struct with a few functions: we will thus start by extending our C API with a C++ class declaration:
class MyClass
{
public:
  void SetInt (int value);
  int GetInt (void) const;
};
We first need to declare a C++ class:
mod = Module('MyModule')
klass = mod.add_class('MyClass')
and, then, specify that it has a constructor:
klass.add_constructor([])
We can declare the setter method which is really a straightforward extension from the add_function function:
klass.add_method('SetInt', None, [param('int', 'value')])
The getter is also pretty straightforward except for the declaration of constness:
klass.add_method('GetInt', retval('int'), [], is_const=True)
Using this API is also very similar to the struct example we went through in the previous section:
>>> my = MyModule.MyClass()
>>> my.SetInt(10)
>>> v = my.GetInt()
>>> print v
10
It is also possible to bind inner classes and enums such as these:
class Outer
{
public:
  void Do (void);
  // an inner enum
  enum inner_e
  {
    INNER_A,
    INNER_B,
    INNER_C
  };
  // an inner class
  class Inner
  {
  public:
    void Do (enum Outer::inner_e value);
  };
};
We just need to bind the outer class:
outer = mod.add_class('Outer')
outer.add_constructor([])
outer.add_method('Do', None, [])
Then, bind its inner enum:
mod.add_enum('inner_e', ['INNER_A', 'INNER_B', 'INNER_C'], outer_class=outer)
and, finally, bind its inner class:
mod.add_class('Inner', outer_class=outer)
inner.add_constructor([])
The only slightly tricky part is binding the Do method of the Inner class since it refers to the enum type defined in the Outer class: we simply need to carefully use the fully scoped name of the enum.:
inner.add_method('Do', None, [param('Outer::inner_e', value)])
The resulting python API reflects the underlying C++ API very closely:
>>> import MyModule
>>> print MyModule.Outer.INNER_A
0
>>> print MyModule.Outer.INNER_B
1
>>> outer = MyModule.Outer()
>>> outer.Do()
>>> inner = MyModule.Outer.Inner()
>>> inner.Do(MyModule.Outer.INNER_A)
C++ namespaces
Wrapping multiple nested namespaces is, of course, possible and represents no special challenge. Let’s look at an example:
namespace Outer {
  void Do (void);
  class MyClass
  {};
  namespace Inner {
    void Do (void);
    class MyClass
    {};
  } // namespace Inner
} // namespace Outer
First, we need to define the Outer namespace:
mod = Module('MyModule')
outer = mod.add_cpp_namespace('Outer')
Then, register its classes and functions:
outer.add_class('MyClass')
outer.add_function('Do', None, [])
and, finally, define the Inner namespace and its associated functions and methods:
inner = outer.add_cpp_namespace('Inner')
inner.add_class('MyClass')
inner.add_function('Do', None, [])
The resulting API, again, sticks to the underlying C++ API by defining one python module for each C++ namespace and making sure that the hierarchy of python modules matches the hierarchy of C++ namespaces:
>>> import MyModule
>>> o = MyModule.Outer.MyClass()
>>> i = MyModule.Outer.Inner.MyClass()
>>> from MyModule.Outer.Inner import *
>>> i = MyClass()
Memory management for pointer types
Until then, we have shown how to pass back and forth data through C/C++ APIs only by value but, a large fraction of real-world APIs use raw pointers (and, in the case of C++, smart pointers) as arguments or return values of functions/methods.
Rather than try to explain the detail of every option offered by PyBindGen to deal with pointers, we will go through a couple of very classic memory management schemes and examples.
Function returns pointer
The API to bind:
class MyClass;
MyClass *DoSomethingAndReturnClass (void);
First, we declare the MyClass type:
mod.add_class('MyClass')
...
Then, if we assume that the function returns ownership of the pointer to the caller, we can write:
mod.add_function('DoSomethingAndReturnClass', retval('MyClass *', caller_owns_return=True), [])
The above will tell PyBindGen that the caller (the python runtime) becomes responsible for deleting the instance of MyClass returned by the function DoSomethingAndReturnClass when it is done with it.
Of course, it is possible to not give back ownership of the returned pointer to the caller:
mod.add_function('DoSomethingAndReturnClass', retval('MyClass *', caller_owns_return=False), [])
Which would make the python runtime assume that the lifetime of the returned pointer is longer than the associated python object.
Function takes pointer
The API to bind:
class MyClass;
void DoWithClass (MyClass *cls);
If we assume that the callee takes ownership of the input pointer, we can write:
mod.add_function('DoWithClass', None, [param('MyClass *', 'cls', transfer_ownership=True)])
Which will make python keep a handle on the MyClass instance but never destroy it himself and rely on the callee to destroy it at the right time. This kind of scheme is obviously a bit dangerous because python has no way of knowing when the underlying MyClass instance is really destroyed so, if you try to invoke methods on it _after_ it has been destroyed, bad things will obviously happen.
If, instead, we assume that the caller keeps ownership of the pointer, we can write the much safer version:
mod.add_function('DoWithClass', None, [param('MyClass *', 'cls', transfer_ownership=False)])
Which will allow python to delete the MyClass instance only when the associated python wrapper disappears.
A reference-counted object
A nice way to avoid some of the ambiguities of the above-mentioned API bindings is to use reference-counted C or C++ objects which must provide a pair of functions or methods to increase or decrease the reference count of the object. For example, a classic C++ reference-counted class:
class MyClass
{
public:
  void Ref (void);
  void Unref (void);
  uint32_t PeekRef (void);
};
And the associated function which takes a pointer:
void DoSomething (MyClass *cls);
To wrap this class, we first need to declare our class:
from pybindgen import cppclass
[...]
mod.add_class('MyClass', memory_policy=cppclass.ReferenceCountingMethodsPolicy(
                  incref_method='Ref',
                  decref_method='Unref',
                  peekref_method='PeekRef'))
The above allows PyBindGen to maintain and track the reference count of the MyClass object while the code below shows how we can declare a function taking a pointer as input:
mod.add_function('DoSomething', None, [param('MyClass *', 'cls', transfer_ownership=False)]
Here, the meaning of transfer_ownership changes slightly. Whithout reference counting, transfer_ownership refers to the transfer of the object as a whole, i.e. either the caller or callee will own the object in the end, but not both. With reference counting, transfer_ownership refers to the transfer of a _reference_. In this example, transfer_ownership=False means that the caller will not “steal” our reference, i.e. it will either not keep a reference to our object for itself, or if it does it creates its own reference to the object by calling the incref method. If transfer_ownership=True it would mean that the caller would keep the passed in reference to itself, and if the caller wants to keep the reference it must call the incref method first.
A more interesting case is that of returning such a reference counted object from a function:
MyClass *DoSomething (void);
While classic reference counting rules require that the callee returns a reference to the caller (i.e., it calls Ref on behalf of the caller before returning the pointer), some APIs will undoubtedly return a pointer and expect the caller to acquire a reference to the returned object by calling Ref himself. PyBindGen hopefully can be made to support this case too:
mod.add_function('DoSomething', retval('MyClass *', caller_owns_return=False), [])
Which instructs PyBindGen that DoSomething is not to be trusted and that it should acquire ownership of the returned pointer if it needs to keep track of it.
A STL container
If you have a function that takes a STL container, you have to tell PyBindGen to wrap the container first:
void DoSomething (std::list<std::string> const &listOfStrings);
Is wrapped by:
module.add_container('std::list<std::string>', 'std::string', 'list') # declare a container only once
[...]
mod.add_function('DoSomething', None, [param('std::list<std::string> const &', 'listOfStrings')])
Advanced usage
Basic interface with error handling
It is also possible to declare a error handler. The error handler will be invoked for API definitions that cannot be wrapped for some reason:
#! /usr/bin/env python

import sys

import pybindgen
from pybindgen import Module, FileCodeSink, retval, param

import pybindgen.settings
import warnings

class ErrorHandler(pybindgen.settings.ErrorHandler):
    def handle_error(self, wrapper, exception, traceback_):
        warnings.warn("exception %r in wrapper %s" % (exception, wrapper))
        return True
pybindgen.settings.error_handler = ErrorHandler()


def my_module_gen(out_file):
    pybindgen.write_preamble(FileCodeSink(out_file))

    mod = Module('a')
    mod.add_include('"a.h"')

    mod.add_function('ADoA', None, [])
    mod.add_function('ADoB', None, [param('uint32_t', 'b')])
    mod.add_function('ADoC', retval('uint32_t'), [])

    mod.generate(FileCodeSink(out_file) )

if __name__ == '__main__':
    my_module_gen(sys.stdout)
In this example, we register a error handler that allows PyBindGen to simply ignore API definitions with errors, and not wrap them, but move on.
The difference between is Parameter.new(...) and param(...), as well as between ReturnValue.new(...) and retval(...) is to be noted here. The main difference is not that param(...) and retval(...) are shorter, it is that they allow delayed error handling. For example, when you put Parameter.new(“type that does not exist”, “foo”) in your python script, a TypeLookupError exception is raised and it is not possible for the error handler to catch it. However, param(...) does not try to lookup the type handler immediately and instead lets Module.add_function() do that in a way that the error handler can be invoked and the function is simply not wrapped if the error handler says so.
Header file scanning with (py)gccxml
If you have gccxml and pygccxml installed, PyBindGen can use them to scan the API definitions directly from the header files:
#! /usr/bin/env python

import sys

import pybindgen
from pybindgen import FileCodeSink
from pybindgen.gccxmlparser import ModuleParser

def my_module_gen():
    module_parser = ModuleParser('a1', '::')
    module = module_parser.parse([sys.argv[1]])
    module.add_include('"a.h"')

    pybindgen.write_preamble(FileCodeSink(sys.stdout))
    module.generate(FileCodeSink(sys.stdout))

if __name__ == '__main__':
    my_module_gen()
The above script will generate the bindings for the module directly. It expects the input header file, a.h, as first command line argument.
Header file scanning with (py)gccxml: python intermediate file
The final code generation flow supported by PyBindGen is a hybrid of the previous ones. One script scans C/C++ header files, but instead of generating C/C++ binding code directly it instead generates a PyBindGen based Python script:
#! /usr/bin/env python

import sys

from pybindgen import FileCodeSink
from pybindgen.gccxmlparser import ModuleParser

def my_module_gen():
    module_parser = ModuleParser('a2', '::')
    module_parser.parse([sys.argv[1]], includes=['"a.h"'], pygen_sink=FileCodeSink(sys.stdout))

if __name__ == '__main__':
    my_module_gen()
The above script produces a Python program on stdout. Running the generated Python program will, in turn, generate the C++ code binding our interface.