Curlish
curl with flames on top
Ever had to speak to an OAuth 2.0 protected resource for debugging purposes? curl is a nice tool, but it totally lacks helpers for dealing with oauth.
curlish comes for the rescue. It is able to remember access tokens for you and inject it into requests. Facebook comes preconfigured so you can start using it right away.
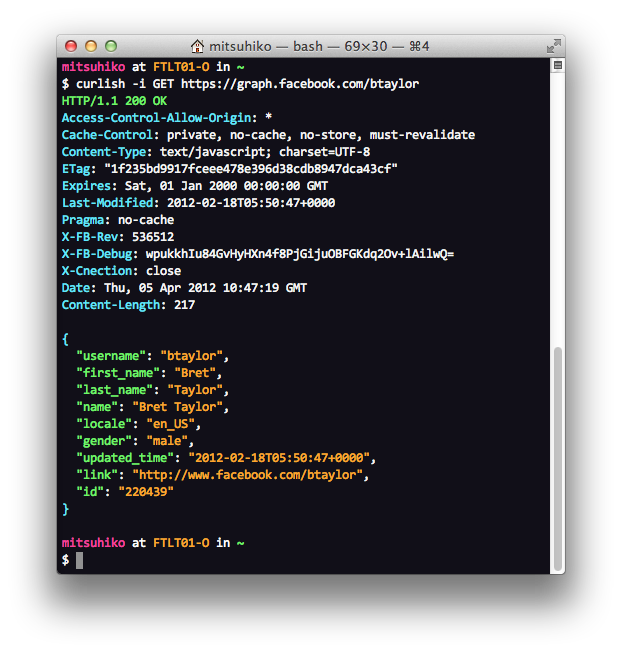
How it Looks
Installation
Curlish is a small script written in Python without any further dependencies but things that are shipped with Python 2.7. If you are running an older Python version you will need to install simplejson.
Quick installation:
$ curl -L http://bit.ly/curlish | bash
This will download the current version of curlish and put it into ~/.bin. Make sure to have that path on your searchpath.
Basic Usage
Out of the box curlish forwards all arguments but the ones that are used to control curlish to the curl executable. The result from curl is processed and nicely colorized if your terminal supports that. Also we’re reindenting JSON for you so that it’s more readable.
To get more out of it you need to register a site with it. This will make curl understand OAuth for a specific API. By default we already have facebook preconfigured for you.
Just use curlish as if it was curl and enjoy.
Configuration
To add a site you can either use --add-site NAME or just edit the ~/.ftcurlish.json file. You will find that it looks something like this:
{
  "http_port": 62231,
  "sites": {
    "facebook": {
      "grant_type": "authorization_code",
      "extra_headers": {},
      "request_token_params": {
        "scope": "email"
      },
      "authorize_url": "https://www.facebook.com/dialog/oauth",
      "base_url": "https://graph.facebook.com/",
      "client_id": "384088028278656",
      "client_secret": "14c75a494cda2e11e8760095ec972915",
      "access_token_url": "/oauth/access_token"
    }
  },
}
These values are all copy/pasted from the application configuration page on Facebook. Adjust that to whatever website you want to talk to. Some important keys and values:
- grant_type
The type of the grant that the API supports. The default is authorization_code which means that a browser based flow is used. This is the most common one. For some services you can switch to a password grant which means that we will prompt you for username and password and exchange that information for a authorization token.
Note that very few services support password based logins.
You can also set the grant to null in which case the OAuth features are disabled. This makes it useful if you want to speak to APIs protected with other schemes. In that case only the extra_headers and base_url parameters are really used.
- extra_headers
- That’s a dictionary of extra headers that are sent with all HTTP requests to the service. You can use this to use a custom authorization headers or similar things.
- request_token_params
- Sent with the authorization request. For instance you can set the scope for the token with that.
- base_url
- The base URL. We will automatically enable this site for you for all requests that start with this base URL. It’s also the base URL for access_token_url and authorize_url if those are not absolute.
- authorize_url
- The authorization URL for the authorization_code flow.
- client_id
- The client ID from the application configuration.
- client_secret
- The client secret from the application configuration.
- access_token_url
- The URL where the token can be managed.
Browser Based Flow
Curlish by default opens an HTTP server on 127.0.0.1:62231 that handles exactly one request which is the response from the authorization dialog. If you need to register an application make sure the redirect URI is http://127.0.0.1:62231. If you can’t use that port for whatever reason you can change it in the config.
Clearing Tokens
Because detecting stale tokens is specific for each individual service we’re not attempting to detect expired tokens. As such if you get a notification that a token is expired from the API you need to remove it from the token cache:
$ curlish --clear-token-cache --site facebook
If you don’t specify the site it will remove all cached tokens.
Common Curl Arguments
- -v
- Enables verbose mode
- -i
- Prints response headers
- -X METHOD
- specifies the HTTP method instead of automatically picking it. For known HTTP methods you can also leave off the -X prefix as a curlish specific feature.
- -H "Header: value"
- Emits a request header with a specific value.
- -d "key=value"
- Emits a pair of form data.
Curl Extension Arguments
In addition to the curl arguments, curlish supports a few other ones as shortcuts for common tasks:
- -Jkey=value
- Sends a JSON string value as key to some object. If the key is empty the whole body of the JSON transmission will just be that string value. The key can be in dotted notation to construct objects. See below.
- -Jkey:=value
- Like -Jkey=value but the value part has to be a JSON object – no conversion to string takes place. You can use this to send integers and boolean values.
- -J@filename
- Sends a file as JSON body to the server.
- -Jkey=@filename
- Sends a JSON body where a key is loaded from a JSON file.
- --ajax
- Sends an X-Requested-With: XMLHttpRequest header.
- GET, POST, etc.
- If it’s one of the common HTTP methods the -X prefix is implicit.
- --cookies
- Enables simple cookie handling for this request. See Automatic Cookie Management for more information.
- --hide-jsonp
- If curlish detects a JSONP response it will by default keep the wrapper function call around. If this is set it will appear as if it was a regular JSON response.
Sending JSON Objects
Since we’re supporting dotted notation you can send complex JSON objects and arrays. Basically the key is in dotted notation and the system figures out the rest:
curlish -Jfoo.int:=1 -Jfoo.string=42
Results in this JSON data:
{
  "foo": {
    "int": 1,
    "string": "42"
  }
}
Automatic Cookie Management
Curlish also simplifies cookie handling compared to plain old curl. If you pass --cookies to curlish it will create a file in ~/.ftcurlish-cookies for each site which stores the cookies in plain text. To delete those cookies again you can either delete that file by hand or pass --clear-cookies to curlish.
