-
The modern way
Pip it
pip install handcrank
Old-fashioned
Easy install it
easy_install handcrank
Or directly from GitHub
Latest and greatest code is available at
-
What is this?
This is a no-frills, get it done, kind of static content generator. It generates a one-page site. It has simple templating yet uses HTML5 and CSS3 and can be extended easily if you are willing to write some Python code.
Get started
You need to install handcrank first, use pip install handcrank if you haven't done so.
Handcrank can create everything you need to get you started.
handcrank --sitedir ~/mysite startsite
This creates a new directory in your home directory called mysite.
You'll notice some things if you look in this directory
- config.cfg
- This configure your site, we'll cover this in detail in the API reference.
- docs
- These are where your reStructuredText files go. We'll go over this in API reference.
- template
- Is the HTML, CSS, and Javascript used to make up site. Again, check the API reference.
Now we'll generate the site
handcrank --sitedir ~/mysite generate
The output will look something like this
__               .--------.
   `.      ______|        |\
    |     / ```` |        | |
    |     |  ,---|        |/
    |_____|  |   `--------'
    | ````   |
    |~~~~~~~/
___.'


Handcrank version 0.1
-_-_ erkkk erkkk

Source rST files .......... (1 files) /Users/johncleese/mysite/docs
Used the template ......... /Users/johncleese/mysite/template
Created ................... /Users/johncleese/mysite/output
The great thing about static sites
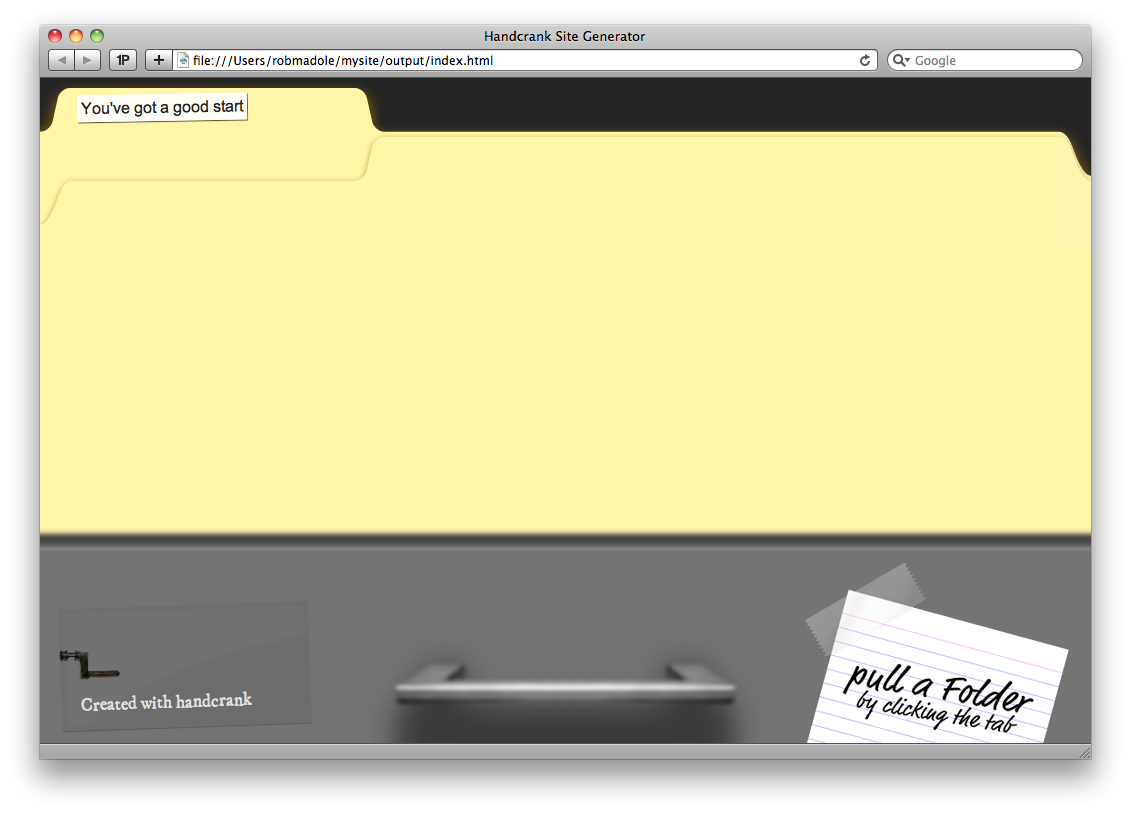
A good static site generator let's you view the site without a server.
If you are on a Mac, you can type this command and view what you've created.
open ~/mysite/output/index.html
Or File, Open in the browser of your choice will get you there as well.
You should see something like this
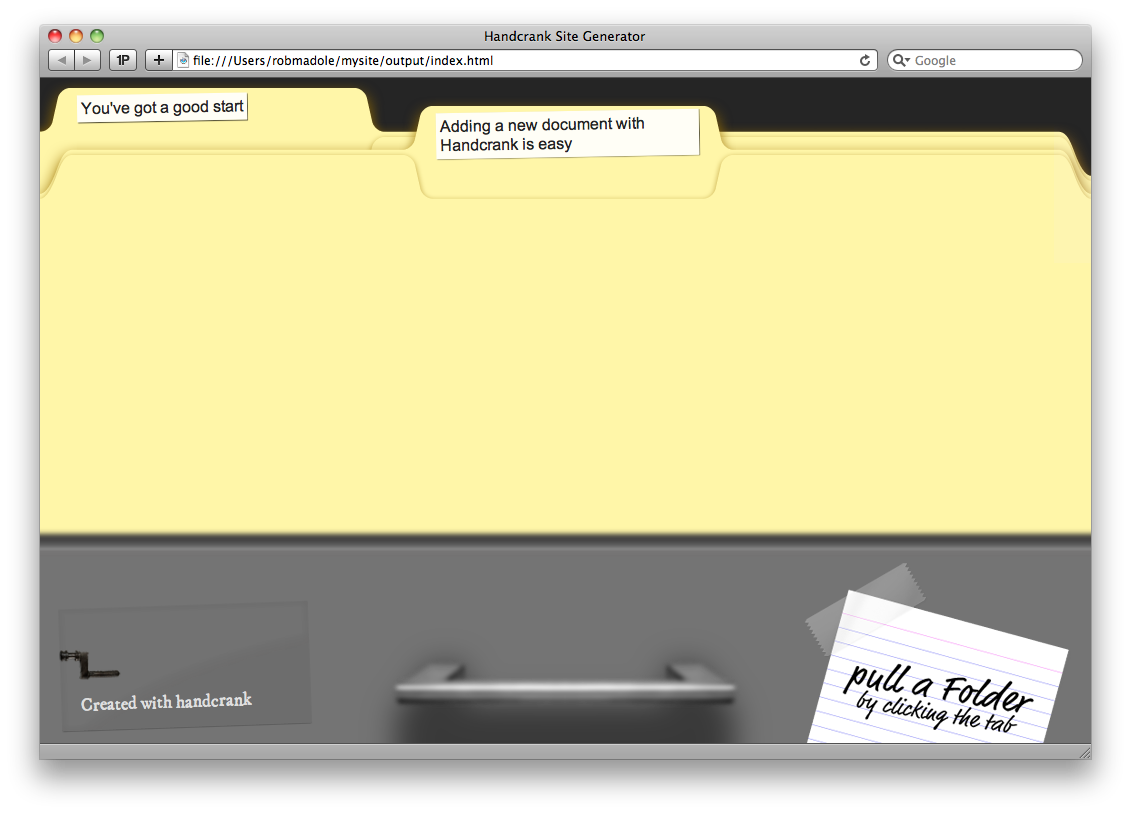
Let's add a document
Create ~/mysite/docs/what_next.rst.
Remember that Handcrank uses reStructuredText. Check the Quick Reference if you want to go all rogue and put your own content in this new file.
Copy paste this into it
============================================
Adding a new document with Handcrank is easy
============================================

Handcrank automatically finds it, and because it's an *.rst* extension, puts
it into your generated site.
Save the file and exit your text editor.
Re-generate the site with the command you used earlier:
handcrank --sitedir ~/mysite generate
It should now tell you that it generated 2 files. Go back to your browser and refresh. You should see this:
Keeping the generator running
It's annoying to keep going back and forth between the handbrake command, your editor, and the browser. We can take one of these annoyances away.
To keep Handbrake up as a daemon, run the following command.
handcrank --keepgoing --sitedir ~/mysite generate
You'll see this as the last line of the output, and notice how the command did not immediately exit.
Running in daemon mode, hit <CTRL-C> to exit
You can edit, add new docs, or change something in the template directory and Handbrake will detect this and automatically regenerate the site for you.
What next
You can continue to add pages to the site or you can dig a little deeper into extending what you already have.
View the API reference to find out how.
Here are some of the things that you can accomplish:
- Change the directories that Handcrank reads documents or templates from
- Change the directory that Handcrank saves your site to
- The additional directive .. code-block and role :doc: added to the reStructuredText parser
- Sort the list in a different order using a Delegate
- Alter the main Jinja2 template file
-
API reference table of content
Basic structure of a site
There are three main directories that you need to worry about when working with a Handcrank site.
- The docs directory which contains your source reStructuredText files
- The template directory which contains a Jinja2 template, CSS, and Javascript
- An output directory which doesn't exist until you generate the site, it contains the generated content
The directory locations and names can be changed using a configuration file.
The docs directory
This directory contains only files with an rst extension. You should organize these files into a flat hierarchy, meaning there should be no sub-directories under this.
Corresponds to [source] in the config file
Here is an example directory listing
total 64
drwxr-xr-x  7 robmadole  staff   238 Sep 21 22:05 .
drwxr-xr-x  8 robmadole  staff   272 Sep 21 22:05 ..
-rw-r--r--  1 robmadole  staff   322 Sep 14 22:23 installation.rst
-rw-r--r--  1 robmadole  staff  6628 Sep 21 22:05 reference.rst
-rw-r--r--  1 robmadole  staff  6437 Sep 11 16:36 sample_styles.rst
-rw-r--r--  1 robmadole  staff   211 Sep  8 12:16 tech_used.rst
-rw-r--r--  1 robmadole  staff  4178 Sep 21 12:01 welcome.rst
Each rST file should begin with a root title like this
=========================
Welcome Holy Grail Seeker
=========================
This title will become the identifier for this document.
The template directory
This directory should contain one index.html file that represents your one-page site. See the templating section for information on how this Jinja2 template should be formatted and what data is available when the site is generated.
Corresponds to [template] in the config file
The output directory
This directory contains your generated site. If your template has a index.html, your output directory will also. Any files in the template directory will be first copied to output before the site is generated.
Corresponds to [output] in the config file
Configuration file
Each site is required to have a configuration file named config.cfg.
Here is a basic example:
[source]
directory = ./docs
delegate = Delegate

[template]
directory = ./template
name = index.html

[output]
directory = ./output
name = index.html
The paths in the config file are relative to the directory the config file is in. This means that for this example, a docs directory should be beside the config.cfg file. A directory listing would look like this
-rw-r--r--   1 robmadole  staff   174 Sep 11 16:34 config.cfg
-rw-r--r--   1 robmadole  staff   468 Sep 15 13:08 delegate.py
drwxr-xr-x   7 robmadole  staff   238 Sep 21 22:55 docs
drwxr-xr-x   7 robmadole  staff   238 Sep 21 22:55 template
drwxr-xr-x   6 robmadole  staff   204 Sep 20 21:58 output
Changing the name for the [output] or [template] sections specifies a different file for the generator to look for or create.
The delegate value in the [source] section is the class name of the object the generator will delegate certain behavior to. See the delegate section for more information. The generator will create an instance of this class when the time is appropriate.
The important thing to note about the delegate is that a delegate.py file or delegate module putting it in Python terms will be imported. If the generator cannot find a delegate module it will fall back to a default that only alphabetizes the source list.
Extensions beyond docutils
Code block directive
To highlight source code, you can use the code block directive. This is copied from the Sphinx project and follows the same syntax.
To highlight Python code
.. code-block:: python
   from os.path import dirname

   # Where are we?
   here = dirname(__file__)
Produces this
from os.path import dirname

# Where are we?
here = dirname(__file__)
You can highlight other code as well, check the Pygments websites for a complete list.
Linking between documents
Handcrank uses a flat directory to store your rST documents. For example if you had the following directory listing in your docs directory.
- index.rst
- the_quest.rst
- the_grail.rst
You can link between the documents with the :doc: role.
I would like to learn more about :doc:`The grail <the_grail.rst`
This produces the following HTML
<a href="the_grail.rst" rel="doc-link">The grail</a>
You'll notice that unless you use Javascript to do something with this, the link is broken, the_grail.rst only exists in the source directory.
The default site created for you when you used handcrank startsite provides the Javascript that expands the appropriate tab when a link is clicked. See the source code for folders.js
Changing the generator behavior
Sites are rendered through the OnePageGenerator class. While it would certainly be possible to alter this, or better yet create a subclass, there is another alternative.
Using a Delegate pattern, we can choose certain key points within the machinery to perform special calls to a delegate.
Here is an example
from datetime import datetime

from handcrank.generator import DelegateBase


class Delegate(DelegateBase):
    def sort_source_list(self, source_list):
        """
        Put installation.rst and welcome.rst first in the list
        """
        return self.items_place_first(
            self.items_sort_alpha(source_list),
            'installation.rst', 'welcome.rst')

    def provide_extra_context(self):
        """
        Adds a generation time that can be used in the template like:

            {{ time_generated }}

        """
        return {'time_generated': datetime.now().strftime('%b %d, %Y')}
Delegate methods
A delegate alters the behavior of the generator in some specific way.
- sort_source_list(source_list)
- Allows the order the documents appear in the page to be rearranged beyond the normal alphabetical. It's important to note that if you implement this method, you will have to call items_sort_alpha yourself as it will not happen automatically.
- provide_extra_context()
- Allows extra arguments via a dictionary to be added to the context when the Jinja2 template is rendered. The dictionary will extend the one created by the generator itself, so the only key you need to avoid is gathering.
A warning about using dict data types
It's probably been a while since reading an introduction to Python, but recall that dict data type keys are not ordered. Because of this, we have to take special care if utilizing them in these delegate methods. If you find yourself reaching for a dict, consider using an OrderedDict instead.
SourceList objects
If you examine a source_list object coming in from the generator you'll notice that the structure is a bit unexpected.
>>> source_list
<handcrank.generator.SourceList instance at 0x1023ed830>
Using a list comprehension, lets look at the first 25 characters of the source.
>>> [(i,j[:25],) for i,j in source_list]
[('installation.rst', 'Installation\n============'), ('reference.rst',
'API Reference\n==========='), ('sample_styles.rst', 'Sample
styling\n=========='), ('tech_used.rst', 'Projects and technology u'),
('welcome.rst', 'Getting started\n=========')]
Notice that iterating through the source list results in a tuple each time the loop moves to the next item. The tuple contains:
- The document's basename, with extension
- The source reStructuredText
('basename', 'source',)Your delegate methods do not have to return a SourceList object, but they do need to adhere to the way the iterator works. Meaning each pass through the loop needs to provide the tuple.
Delegate helpers
To save some time, the following helper methods provide these features:
- items_place_first(source_list, first_doc_name[, second_docs_name[, ...]])
- Takes a source list and places the doc names passed in
- items_sort_alpha(source_list)
- Sorts the source files by title, alphabetically
You can see both of these helper methods used in this example:
def sort_source_list(self, source_list):
    """
    Put installation.rst and welcome.rst first in the list
    """
    return self.items_place_first(
        self.items_sort_alpha(source_list),
        'installation.rst', 'welcome.rst')
Templating
Jinja2 is used for templating. Check out the documentation.
Our main object containing the generated content is the gathering object.
- gathering
- A list of generated documents, the key is the title like The quest and the value is an object with variables obtained from docutils html4css1 writer.
Here is a very simple example index.html Jinja2 template that uses this variable.
<!DOCTYPE html>
<html lang="en">
    <head>
    <meta charset="utf-8" />
    <title>Handcrank Site Generator</title>
    </head>
    <body>
        <header>Documentation</header>

        {% for title in gathering %}
            <article class="folder">
                <h1>{{ title }}</h1>
                {{ gathering[title]['fragment'] }}
            </article>
        {% endfor %}
    </body>
</html>
Once within the for loop, the following values are available.
- title
- Assuming you have for title in gathering, it will be the first title encountered in the rST file. Like The quest.
- basename
- The filename of the document, like the_quest.rst.
- body
- Rendered HTML representing the rest of the document, this will not include the title.
The generator uses docutils, specifically the publish_parts function and the html4css1 writer, to generate the content it then renders, so you have access to more than just the information above.
A full list of variables here:
- subtitle
- version
- encoding
- basename
- html_prolog
- header
- meta
- html_title
- title
- stylesheet
- html_subtitle
- html_body
- body
- head
- body_suffix
- fragment
- docinfo
- html_head
- head_prefix
- body_prefix
- footer
- body_pre_docinfo
- whole
Adding extra context
The example above used provide_extra_context to allow a formatted date to be added to the available data when the template renders.
Taking another look at that:
def provide_extra_context(self):
    """
    Adds a generation time that can be used in the template like:

        {{ time_generated }}

    """
    return {'time_generated': datetime.now().strftime('%b %d, %Y')}
A dictionary is returned containing one key, time_generated.
To use this within the template is fairly straight-forward.
<!DOCTYPE html>
<html lang="en">
    <head>
    <meta charset="utf-8" />
    <title>Handcrank Site Generator</title>
    </head>
    <body>
        <header>Documentation</header>

        {% for title in gathering %}
            <article class="folder">
                <h1>{{ title }}</h1>
                {{ gathering[title]['fragment'] }}
            </article>
        {% endfor %}

        <footer>Generated on {{ time_generated }}</footer>
    </body>
</html>
-
reStructuredText supports a lot of markup. This page tries to display a large combination of all of them. While developing handcrank, this page was used to make sure everything looks awesome.
You can view the quick-start guide for reStructureText here. From there you can get to the rest of the documentation for it.
This is the largest heading
First sub-heading
Second sub-heading
Third sub-heading
This is a paragraph with a lot of text in it. Part of the text can have emphasis while other parts of it can have strong emphasis. We can also have interpreted text that has domain-specific context. An inline literal is great for putting code snippets in.
It has multiple paragraphs.
Bullet lists
- This is item 1
- This is item 2
- Bullets are "-", "*" or "+". Continuing text must be aligned after the bullet and whitespace.
Enumerated lists
- This is the first item
- This is the second item
- Enumerators are arabic numbers, single letters, or roman numerals
- List items should be sequentially numbered, but need not start at 1 (although not all formatters will honour the first index).
- This item is auto-enumerated
Definition lists
- what
- Definition lists associate a term with a definition.
- how
- The term is a one-line phrase, and the definition is one or more paragraphs or body elements, indented relative to the term. Blank lines are not allowed between term and definition.
Field lists
Authors: Tony J. (Tibs) Ibbs, David Goodger (and sundry other good-natured folks) Version: 1.0 of 2001/08/08 Dedication: To my father. Option lists
-a command-line option "a" -b file options can have arguments and long descriptions --long options can be long also --input=file long options can also have arguments /V DOS/VMS-style options too Literal blocks
A paragraph containing only two colons indicates that the following indented or quoted text is a literal block.
Whitespace, newlines, blank lines, and
all kinds of markup (like *this* or
\this) is preserved by literal blocks.

The paragraph containing only '::'
will be omitted from the result.
The :: may be tacked onto the very end of any paragraph. The :: will be omitted if it is preceded by whitespace. The :: will be converted to a single colon if preceded by text, like this:
It's very convenient to use this form.
Literal blocks end when text returns to the preceding paragraph's indentation. This means that something like this is possible:
    We start here
  and continue here
and end here.
Per-line quoting can also be used on unindented literal blocks:
> Useful for quotes from email and
> for Haskell literate programming.
Code blocks
class HtmlCodeBlock(Directive):
    """
    Borrowed from the Sphinx project
    """

    has_content = True
    required_arguments = 1
    optional_arguments = 0
    final_argument_whitespace = False
    option_spec = {
        'linenos': directives.flag,
    }

    def run(self):
        code = u'\n'.join(self.content)

        linenos = 'linenos' in self.options
        lexer = get_lexer_by_name(self.arguments[0])
        formatter = HtmlFormatter(linenos=linenos)

        hi_code = highlight(code, lexer, formatter)

        raw = nodes.raw('', hi_code, **{'format': 'html', 'source': None})
        return [raw]

directives.register_directive('code-block', HtmlCodeBlock)
Line blocks
Line blocks are useful for addresses,verse, and adornment-free lists.Each new line begins with avertical bar ("|").Line breaks and initial indentsare preserved.Continuation lines are wrapped portions of long lines; they begin with spaces in place of vertical bars.Block quotes
Block quotes are just:
Indented paragraphs,
and they may nest.
Grid table
Header 1 Header 2 Header 3 body row 1 column 2 column 3 body row 2 Cells may span columns. body row 3 Cells may span rows. - Cells
- contain
- blocks.
body row 4 Transition
A transition marker is a horizontal line of 4 or more repeated punctuation characters.
A transition should not begin or end a section or document, nor should two transitions be immediately adjacent.
Footnotes
Footnote references, like [5]. Note that footnotes may get rearranged, e.g., to the bottom of the "page".
[5] A numerical footnote. Note there's no colon after the ]. Autonumbered footnotes are possible, like using [1] and [2].
[1] This is the first one. [2] This is the second one. They may be assigned 'autonumber labels' - for instance, [4] and [3].
[3] a.k.a. third [4] a.k.a. fourth Citations
Citation references, like [CIT2002]. Note that citations may get rearranged, e.g., to the bottom of the "page".
[CIT2002] A citation (as often used in journals). Citation labels contain alphanumerics, underlines, hyphens and fullstops. Case is not significant.
Given a citation like [this], one can also refer to it like this.
[this] here. Images

-
Here are the numerous "shoulders of giants" that I stood upon while cobbling this together. Thanks to all these projects for saving me so much time.
- Python http://python.org
- Docutils http://docutils.sourceforge.net/
- Sphinx http://sphinx.pocoo.org/
- Jinja2 http://jinja.pocoo.org/2/
- Pygments http://pygments.org
- Dojo Toolkit http://dojotoolkit.org
- lessjs (pre-release) http://github.com/cloudhead/less.js
For development and testing: